Optional – Load-Balance Multiple Stream Managers
A lot of times your expected traffic load might outgrow the handling capacity of a single Stream Manager deployment. It might also be that you chose to deploy multiple smaller virtual machines as necessary as opposed to deploying a single large instance. Any of these conditions calls for using a load balancing solution. Azure offers two types of load balancing solutions: Azure Application Gateway & Azure Load Balancer. Out of these only Azure Application Gateway provides the SSL termination feature which is needed to make Stream Manager’s WebSocket Proxy work for WebRTC clients. This section will describe how to successfully configure one or more Stream Manager instances behind an Azure application gateway.
Prerequisites:
- Two or more Stream Manager instances in your autoscaling resource group.
- Create the first Stream Manager per the above instructions, then create an
imagefrom that instance and delete the instance. Deploy two or more Stream Manager instances from thatimage. We currently support only one subnet in a different subnet than the first one, for better redundancy. It is essential that the config files be identical between the two stream managers with one exception: - For each deployed instance, edit
red5pro/webapps/streammanager/WEB-INF/red5-web.propertiesand modify## LOAD BALANCING CONFIGURATION section,streammanager.ip=property by adding the Assigned IP address of the individual Stream Manager instance you are modifying or a uniqueFQQDN. This value serves as a unique id for the Stream Manager instances.
- Create the first Stream Manager per the above instructions, then create an
- Add all Stream Manager public IP addresses to the database firewall rules.
- You should have access to your domain management interface so that you can create a domain record to associate with the Application Gateway
Frontend-IP-Configuration. - Access to a valid
SSL certificatefrom recommended certificate providers.
NOTE: This walkthrough is created using a windows machine. a few of the steps that are performed locally might be different for Mac/Linux users.
Prepare subnet for application gateway
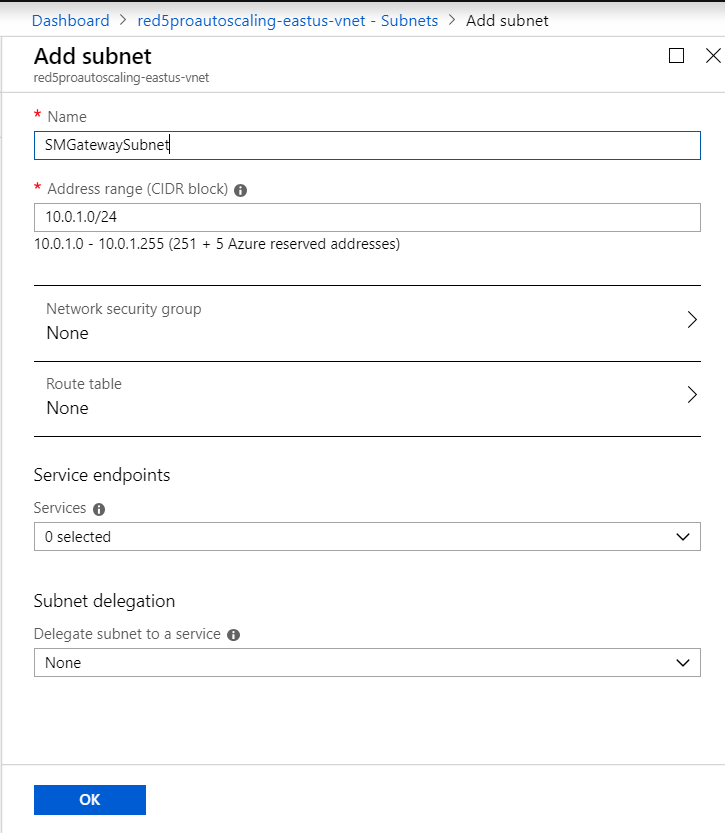
Create an additional subnet in your Red5 Pro autoscaling virtual network to host the application gateway. Overall your virtual network should contain two subnets. One for application gateways and one for instances.
- Navigate to Virtual networks.
- Click and select your Red5 Pro autoscaling virtual network to see details
- Click on Subnets and click on + Subnet
- Provide a name for the subnet such as
SMGatewayto identify it for use with the application gateway. - Leave all other settings to default
- Click ok to create the subnet
Convert Your certificate to PFX format
Azure application gateway requires the SSL certificate (For SSL termination) to be in PFX format. When you create a new application gateway, you will be required to upload your certificate if you create an HTTPS listener. Here we demonstrate using letsencrypt certificate but you can use the same method for a certificate from any of the recommended SSL providers.
The first thing to know here is that the fullchain.pem file is your final certificate file which is used by the server and the privkey.pem file is the private key. Windows comes preinstalled with a tool called certutil which can be used to convert certificates to pfx format very easily. To generate a pfx version of your certificate do the following:
- Navigate into the directory where all the certificate files are located. This will contain the
fullchain.pem,privkey.pemand other related files as per your provider. - Temporarily rename
fullchain.pemascertificate.cer - Temporarily rename
privkey.pemascertificate.key - The certificate and the private key should have the same name for
certutilto locate & associate them. - Launch a command prompt in the current directory and execute the following command:
certutil -mergepfx certificate.cer certificate.pfx
- The utility will check your certificate and then if all goes well, you should see the following:
Signature test passed
Enter new password for output file certificate.pfx:
Enter new password:
- Enter a cert password for the pfx file and press
Enter - Confirm by re-entering when prompted
- Finally if your password confirmation was correct you should see a message confirming that the pfx output was successful.
CertUtil: -MergePFX command completed successfully.
- You should now have a
certificate.pfxfile in your directory. This will be used when creating a new application gateway. - Rename your files back.
Create Application Gateway
-
Navigate to Application gateways.
-
Click on Create application gateway to start creating your application gateway.
-
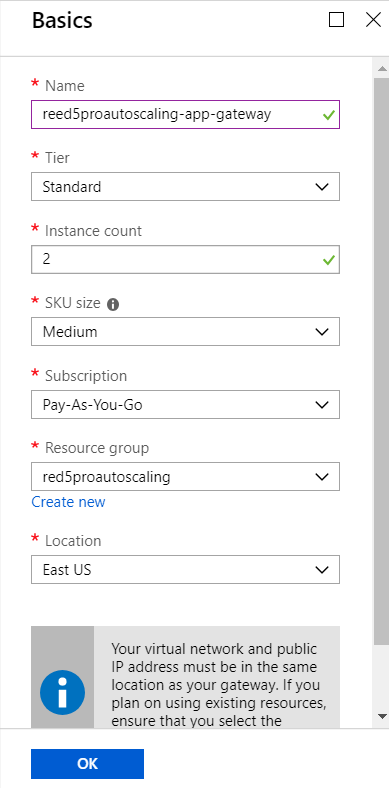
Step 1: Configure basic settings:
-
- Give the load balancer a name
-
- Tier: Standard
-
- Instance count: 2 or more (as many Stream Managers as you wish to use)
-
- SKU size: Medium or Large. See pricing details for more info.
-
- Subscription: Select your subscription
-
- Resource Group: Select your autoscaling resource group
-
- Location: Select the region where you will be deploying the application gateway
-
- Click ok to continue
- Step 2: Configure application gateway:
-
- Select your virtual network intended for red5pro autoscaling
-
- Subnet: Select the new subnet previously created (ex:
SMGateway) for the application gateway
- Subnet: Select the new subnet previously created (ex:
-
- For Frontend IP configuration -> IP address type, select
Public
- For Frontend IP configuration -> IP address type, select
-
- Under
Public IP addresses, select Create New. A name is automatically filled in for you.
- Under
-
- Leave the IP address configuration to defaults. You can optionally fill in a unique value for
DNS name label.
- Leave the IP address configuration to defaults. You can optionally fill in a unique value for
Note: You can also assign an existing static IP address to the application gateway if you have an existing resource.
-
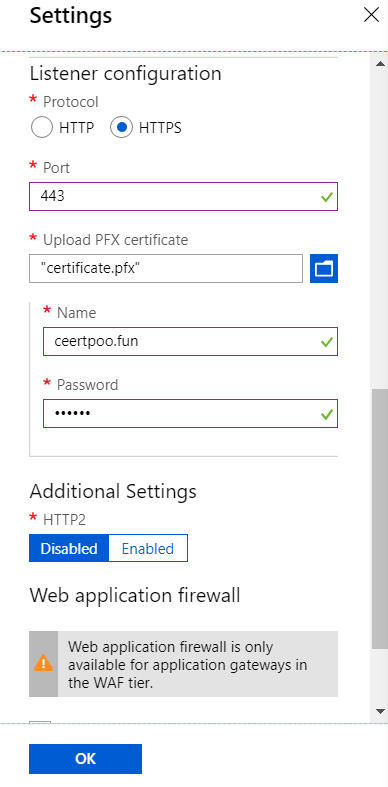
- For Listener configuration select HTTPS. On selecting
HTTPSyou get an option to upload the certificate.
- For Listener configuration select HTTPS. On selecting
-
- Upload PFX certificate
-
- Browse and select your PFX certificate to upload it to Azure
-
- Provide a simple readable name for the certificate
-
- Enter the pfx certificate password that was created earlier
-
- Leave other settings to default
-
- Click ok to continue
-
Step 3: Summary
-
- Review the summary of your configuration and then click ok to submit the request.
It might take a few minutes for the application gateway to get created. You might need to keep watching the Dashboard / Application Gateway section periodically for status.
Preparing the Backend Pool
Once your application gateway is ready, you can start configuring it to route traffic to the Stream Manager instances.
- Navigate to Application gateways.
- Click on your application gateway and open options
- Click on Backend Pools and then click select the first item in the list (appGatewayBackendPool)
- Under Edit Backend Pool
Targetsselect Virtual Machine as the target type - Select a Stream Manager instance under virtual machine and its corresponding network interface from the dropdown. Repeat the steps for each Stream Manager to be registered.
- Click on Save to save the backend pool configuration.
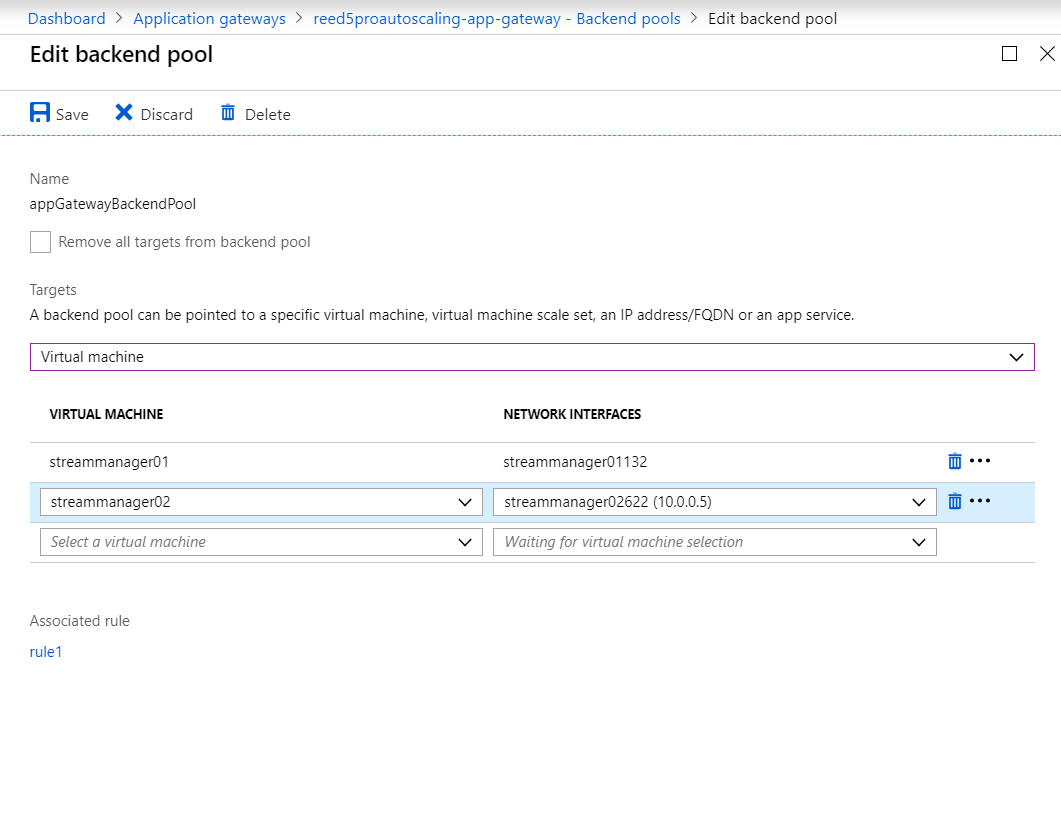
Updating an application gateway can take a few minutes. Do not try to update other settings before the request is completed.

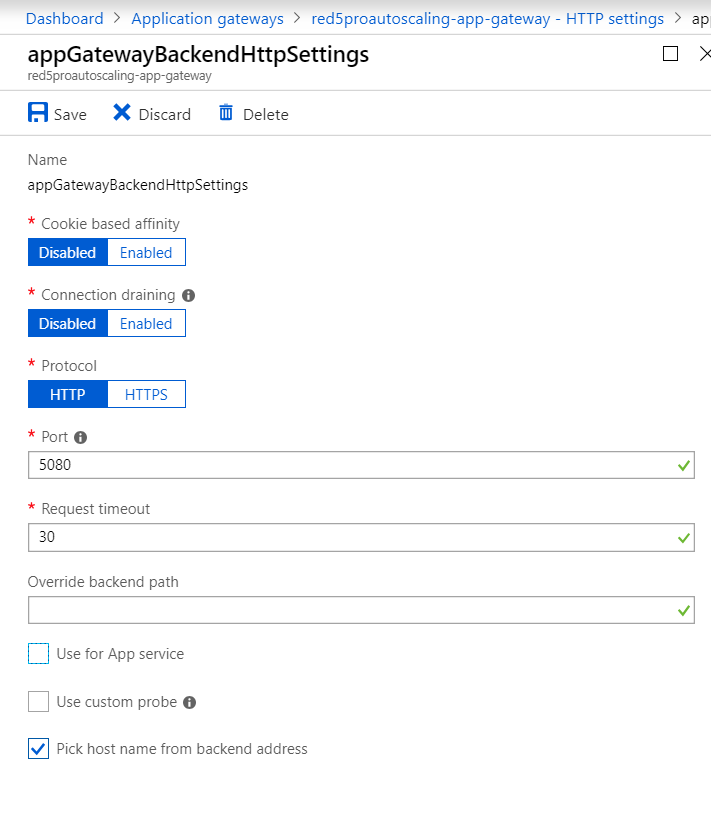
Preparing HTTP Settings for Traffic Routing
The next step is to configure the traffic routing. We need to specify the receiving port/protocol of the target.
- Click on HTTP settings and click select on the first item in the list (appGatewayBackendHttpSettings).
- Leave cookie based affinity disabled
- Leave connection draining disabled
- Select protocol as HTTP
- Set port as
5080 - Leave Request Timeout duration to default
- Leave Override backend path empty
- Select Pick host name from backend address. (Other checkboxes should be deslected since we are not using App Service or a Custom Probe).
- Click on Save to save the HTTP settings
*Note: The above configuration automatically will create a health probe on the specified port. Thus you need not to create a health probe explicitly
Updating an application gateway can take a few minutes. Do not try to update other settings before the request is completed.

Creating a DNS to access the application gateway
- With your application gateway selected, click on Frontend IP configurations and click select on the first item in the list (appGatewayFrontendIP), which says configured.
- Click on the Public IP address resource to view details. This is the
public IP addressof your application gateway. However for our SSL certificate to work, we need an FQQDN.

Note: Public IP is not assigned till your application is completely ready.
- Go to your domain management interface and create a
DNS A recordpointing the hostname to the public IP address of the application gateway. The DNS hostname should correspond with the SSL certificate uploaded while creating the application gateway.

DNS propagation can take up to 24 hours in the worst case.
- When the DNS record has propagated, you can type the hostname in the browser to access the application gateway. At this point, you should be seeing the Stream Manager through the application gateway, with the browser saying that the connection is
Secure.
Azure application gateway also offers a lot more than the scope of this document. We encourage you to explore other configuration options that might be beneficial to your use case as necessary. Mor more information explore the official overview documentation on application gateway.
Set Scaling Policy
With Stream Manager API v3.0, the Scaling and Launch policies are set via the API (see scale policy management and launch policy management).
Using a tool like Postman, you must set a scaling policy before creating any node groups. The policy supports two optional attributes per role target – scaleInWaitTime & scaleOutWaitTime. These are optional parameters denoting delayed scale-in/scale-out time in milliseconds. The attributes require positive values (>=0). If the attribute is omitted it defaults to 0. For more information see scale policy description.
You will need to create a scaling policy that includes each node type that you want in your setup. If you want to take advantage of the new features (multi-bitrate streaming, adaptive bitrate subscribing, and dynamic clustering) you need to have a minimum of two each origin, edge, and relay nodes. If you want to include VP8 transcoding support, then you also need two transcoder nodes.
POST call:
https://<streammanager_URL>/streammanager/api/4.0/admin/configurations/scalepolicy?accessToken=<accessToken>Data (make sure to select JSON as the body type):
{
  "policy": {
    "name": "<policy-name>",
    "description": "<policy-description>",
    "type": "<policy-type>",
    "version": "<policy-version>",
    "targets": {
        "region": [{
        "name": "default",
        "target": [{
          "role": "<role>",
          "minLimit": "<min-node-count>",
          "maxLimit": "<max-node-count>",
          "scaleAdjustment": "<node-scale-adjustment>"
      }]
      }]
    }
  }
}
Example:
REQUEST:
https://<streammanager_URL>/streammanager/api/4.0/admin/configurations/scalepolicy?accessToken=xyz123Data:
   {
   "policy": {
    "name": "default-v3",
    "description": "Sample Scale Config policy with all node types",
    "type": "com.red5pro.services.autoscaling.model.ScalePolicyMaster",
    "version": "0.0.3",
    "targets": {
      "region": [{
        "name": "default",
        "target": [{
            "role": "edge",
            "maxLimit": 20,
            "scaleAdjustment": 1,
            "minLimit": 2
          },
          {
            "role": "origin",
            "maxLimit": 10,
            "scaleAdjustment": 1,
            "minLimit": 2
          },
          {
            "role": "relay",
            "maxLimit": 10,
            "scaleAdjustment": 1,
            "minLimit": 2
          },
          {
            "role": "transcoder",
            "maxLimit": 10,
            "scaleAdjustment": 1,
            "minLimit": 2
          }
        ]
      }]
    }
  }
}
Set Launch Configuration Policy
You will need to create a launch policy that includes each node type that you want in your setup. If you want to take advantage of the new features (multi-bitrate streaming, adaptive bitrate subscribing, and dynamic clustering) you need to have a minimum of two each origin, edge, and relay nodes. If you want to include VP8 transcoding support, then you also need two transcoder nodes.
The vmSizeFallbacks Property
The Azure cloud controller supports a special property called vmSizeFallbacks which can be used to specify a list of fallback instance types for your instance launches. If the virtual machine size type specified via the instanceType property is not available in the target region, the controller will attempt to use one of the alternatives specified in the list in sequential order. The vmSizeFallbacks property is a JSON array of strings, where each value implies an azure virtual machine size.
POST call:
https://<streammanager_URL>/streammanager/api/4.0/admin/configurations/launchconfig?accessToken=<accessToken>Data (make sure to select JSON as the body type):
   {
    "launchconfig": {
      "name": "<configuration-name>",
      "description": "<configuration-descrption>",
      "image": "<red5pro-image>",
      "version": "0.0.3",

    "targets": {
        "target": [
      {
        "role": "<role>",
        "via instanceType": "<instance-type>",
        "connectionCapacity": "<instance-capacity>"
      }
      ]
      },

      "properties": {
        "property": [
          {
            "name": "<property-name>",
            "value": "<property-value>"
          }
        ]
      },
      "metadata": {
        "meta": [
          {
            "key": "<meta-name>",
            "value": "<meta-value>"
          }
        ]
      }
    }}
Example : Launch configuration without fallback instance types.
REQUEST:
https://<streammanager_URL>/streammanager/api/4.0/admin/configurations/launchpolicy?accessToken=xyz123Data:
     {
    "launchconfig": {
      "name": "all-nodes-launch",
      "description": "Sample Launch Config with all four nodetypes",
      "image": "red5pro-image-name",
      "version": "0.0.3",

      "targets": {
          "target": [
        {
          "role": "origin",
          "instanceType": "Standard_D1",
          "connectionCapacity": "2000"
        },
        {
          "role": "edge",
          "instanceType": "Standard_D1",
          "connectionCapacity": "2000"
        },
        {
          "role": "relay",
          "instanceType": "Standard_D1",
          "connectionCapacity": "2000"
        },
        {
          "role": "transcoder",
          "instanceType": "Standard_D2",
          "connectionCapacity": "2000"
        }
         ]
        },
        "properties": {
      "property": [{
        "name": "property-name",
                "value": "property-value"
     }]
    },,
        "metadata": {
          "meta": [
            {
              "key": "meta-name",
              "value": "meta-value"
            }
          ]
        }
      }}
Example : Launch configuration with fallback instance types (Recommended).
REQUEST:
https://<streammanager_URL>/streammanager/api/4.0/admin/configurations/launchpolicy?accessToken=xyz123Data:
     {
    "launchconfig": {
      "name": "all-nodes-launch",
      "description": "Sample Launch Config with all four nodetypes",
      "image": "red5pro-image-name",
      "version": "0.0.3",

      "targets": {
          "target": [
        {
          "role": "origin",
          "instanceType": "Standard_D1",
          "connectionCapacity": "2000"
        },
        {
          "role": "edge",
          "instanceType": "Standard_D1",
          "connectionCapacity": "2000"
        },
        {
          "role": "relay",
          "instanceType": "Standard_D1",
          "connectionCapacity": "2000"
        },
        {
          "role": "transcoder",
          "instanceType": "Standard_D2",
          "connectionCapacity": "2000"
        }
         ]
        },
        "properties": {
        "property": [{
        "name": "vmSizeFallbacks",
        "value": ["Standard_F2s", "F2Standard_F2", "Standard_B2ms", "Standard_D2s_v3"]
     }]
    },,
      "metadata": {
          "meta": [
            {
              "key": "meta-name",
              "value": "meta-value"
            }
          ]
        }
      }}